
Thursday, September 24, 2015
Sunday, April 12, 2015
Success!
Repaired door panel re-installed. (Little strand of fiberglass peeping out from behind ...will get around to removing it ... eventually.)

Slightly different angle.

And it really, really works! Hubs said I did a good job! Woohoo!
Still in line to be fixed: completing of hood painting and clear coating; dashboard crack repaired; new dash grill ordered and installed. Visors re-covered.

Slightly different angle.
And it really, really works! Hubs said I did a good job! Woohoo!
Still in line to be fixed: completing of hood painting and clear coating; dashboard crack repaired; new dash grill ordered and installed. Visors re-covered.
Friday, April 10, 2015
Door Panel and Handle Repair
My next project on the Blazer was making the driver's door panel stick to the door. I can't close the
door with the armrest pull because it just pulls door panel, not the
door. Trying to close the door by hooking fingertips where the panel
ends at the window just shreds my fingernails. New pins attaching the
panel to the door haven't help. So, I watched a video about removing the
door panel and discovered -- the panel is all one piece. I thought the
bottom was separate from the top. Turns out my panel was cracked.

So I removed it and fiberglassed the crack back together. It's not a perfect job by any means, and fiberglass guys are probably aghast or laughing hysterically.... But it's all one piece again.

The discolored areas of the upholstered section ... plain old dirt.

I cleaned it with castile soap (because it rinses off so easily and thoroughly) and it looks so much better now than it did in this picture. Still needs a few more swipes, though.
This seemed a logical time to repair the door handles, since the panel was off, so I tackled that next. The spring at the base of the interior pull, where it pivots, must've "sprung" in some way, because it wouldn't snap the door handle back into the housing (though it opened the door okay). Turned out there is no spring. Have no idea what happened to it.
The housing or frame, or whatever it's called, of the exterior door handle was loose, too, and would pull away from the door slightly when you opened the door.
When I took the interior door panel off, hubs found a little hex bolt down in the bottom of the door. Eventually, I figured out that it had fallen off the back of the exterior door handle, and that's why the handle was loose. I watched a video on how to remove and replace the exterior door handle, and saw that the outside bolt hole was reached through an access hole in the metal part of the door, about an inch or so in diameter. I put all that back for hubs because I knew I'd never be able to fix it.
Meanwhile, I concentrated on the interior door handle. I tried every way I could to fix it. Not only would it not be fixed -- it stopped opening the door!
I ordered a new one of these, and the very day it arrived, I was sitting sideways in the driver's seat, taking the old one off and getting ready to install the new one. Three plastic tabs fit into three slots and then the part was pushed forward and snapped into place.... Except the back tab was too wide for the slot and it wouldn't go in. So I sanded the edges a little and it fit.
I realized some parts were missing from the new mechanism -- a sort of triangular plastic plate that operated the door lock, and a plastic clip and bushing-type of thing that the door opener rod dropped into near the pull pivot.
I took those parts off the old mechanism, put them on the new one, installed it, and STILL the door wouldn't open. I carefully inspected everything. I remembered the fellow in the YouTube video cautioning DIY repairers to make certain the rods were in their clips about halfway between the black plastic part and the outside edge of the door. So I checked and immediately saw the problem. The bottom half of the clip that held the opener rod was broken off. When the door handle was pulled, the rod moved down instead of forward or back...
Hmmm... I considered this a moment, looking at the little oval plastic piece that had both clips on it, one above the other. Removed the rods. Tugged on the plastic part, turned it upside down, and put it back in its place. Now the unbroken clip was on the bottom, and I popped the opener rod into it. The door lock rod sort of rested on the broken top clip, but it didn't have a tendency to move up or down when engaged, but moved back and forth, as it should.
That fixed it!
Hubs got home from work and inspected my repair job, then found the tool necessary to reinstall the bolt that would tighten the outside door handle. Took him a few tries -- there was something in the way inside the access hole, and it was impossible to see inside there, anyway. Nevertheless, he found the bolt hole and tightened the bolt.
Now the door opens and closes -- from the inside or outside -- with a very solid sound, almost like it did when the vehicle was new!
Next step -- buy pins to hold the door panel on, put the automatic window and door lock controls back in place, install the bolts beneath the armrest, and, as my Pop used to say, "Bob's your uncle!"
Then it's back to working on the body -- finish removing the clear coat and oxidized paint, and repaint and re-clear coat the hood. I don't think it's going to be fun ... several coats of each with sanding in between ... and I still don't know how well the rattle-can paint will match the existing color.
But it's bound to look better than it did when I started.
Invaluable door handle repair videos:
Exterior Door Handle Replacement
https://youtu.be/llM4MQ27c-Q
Interior Door Handle Replacement
https://youtu.be/oxO1QsfHaRk

So I removed it and fiberglassed the crack back together. It's not a perfect job by any means, and fiberglass guys are probably aghast or laughing hysterically.... But it's all one piece again.
The discolored areas of the upholstered section ... plain old dirt.
I cleaned it with castile soap (because it rinses off so easily and thoroughly) and it looks so much better now than it did in this picture. Still needs a few more swipes, though.
This seemed a logical time to repair the door handles, since the panel was off, so I tackled that next. The spring at the base of the interior pull, where it pivots, must've "sprung" in some way, because it wouldn't snap the door handle back into the housing (though it opened the door okay). Turned out there is no spring. Have no idea what happened to it.
The housing or frame, or whatever it's called, of the exterior door handle was loose, too, and would pull away from the door slightly when you opened the door.
When I took the interior door panel off, hubs found a little hex bolt down in the bottom of the door. Eventually, I figured out that it had fallen off the back of the exterior door handle, and that's why the handle was loose. I watched a video on how to remove and replace the exterior door handle, and saw that the outside bolt hole was reached through an access hole in the metal part of the door, about an inch or so in diameter. I put all that back for hubs because I knew I'd never be able to fix it.
Meanwhile, I concentrated on the interior door handle. I tried every way I could to fix it. Not only would it not be fixed -- it stopped opening the door!
 |
| monsterautoparts.com |
I ordered a new one of these, and the very day it arrived, I was sitting sideways in the driver's seat, taking the old one off and getting ready to install the new one. Three plastic tabs fit into three slots and then the part was pushed forward and snapped into place.... Except the back tab was too wide for the slot and it wouldn't go in. So I sanded the edges a little and it fit.
I realized some parts were missing from the new mechanism -- a sort of triangular plastic plate that operated the door lock, and a plastic clip and bushing-type of thing that the door opener rod dropped into near the pull pivot.
 |
| a1autoparts.com |
Hmmm... I considered this a moment, looking at the little oval plastic piece that had both clips on it, one above the other. Removed the rods. Tugged on the plastic part, turned it upside down, and put it back in its place. Now the unbroken clip was on the bottom, and I popped the opener rod into it. The door lock rod sort of rested on the broken top clip, but it didn't have a tendency to move up or down when engaged, but moved back and forth, as it should.
That fixed it!
Hubs got home from work and inspected my repair job, then found the tool necessary to reinstall the bolt that would tighten the outside door handle. Took him a few tries -- there was something in the way inside the access hole, and it was impossible to see inside there, anyway. Nevertheless, he found the bolt hole and tightened the bolt.
Now the door opens and closes -- from the inside or outside -- with a very solid sound, almost like it did when the vehicle was new!
Next step -- buy pins to hold the door panel on, put the automatic window and door lock controls back in place, install the bolts beneath the armrest, and, as my Pop used to say, "Bob's your uncle!"
Then it's back to working on the body -- finish removing the clear coat and oxidized paint, and repaint and re-clear coat the hood. I don't think it's going to be fun ... several coats of each with sanding in between ... and I still don't know how well the rattle-can paint will match the existing color.
But it's bound to look better than it did when I started.
Invaluable door handle repair videos:
Exterior Door Handle Replacement
https://youtu.be/llM4MQ27c-Q
Interior Door Handle Replacement
https://youtu.be/oxO1QsfHaRk
Saturday, March 28, 2015
A Swerve....
When I first started this blog, I said, "Although my little Florida bungalow will be the primary focus of this blog, I'll no doubt often swerve into related areas -- decor, architecture, the 50s, the 60s, vintage fashion, and great memories... Come along with me, if you'd like. It'll be fun!"
I had no idea one swerve would take me into auto repair.
We have a 1998 Chevy Blazer. We got it used about 12 years ago or so. As you might expect with a vehicle that old, some misfortunes have occurred, including catastrophic clear coat failure on the hood. This wasn't such a big deal when my husband just drove the vehicle back and forth to work. But now he has a pickup truck for work, I've inherited the Blazer, and I'm embarrassed to be seen in it.
Until and unless I become a best-selling author making beaucoup money, there's not a new car purchase, or even a used one, in the foreseeable future. And frankly, I'd just as soon not spend my retirement on an auto paint job.
So I've been reading up online about DIY clear coat repair and auto painting, and I decided on a plan of action. Beneath the clear coat -- where it has peeled and some places where it is intact, the paint has oxidized. I wondered if, beneath the oxidation, the color was still there. Back in the old days, before clear coat, when auto paint oxidized, it could be buffed out.
After Googling and reading, I concluded buffing wouldn't do the job. I needed to remove the clear coat and sand the paint to get rid of the oxidized areas. Once the whole hood was more or less the same color, I could reapply clear coat.
I don't have a lot of time to spend on the project -- just parts of each day. But I've been at it -- sanding -- for two days, and there has been some progress. Today, I remembered reading online about somebody who had scraped off their failing clear coat with a razor scraper. I found one I had stashed away for house fix up, and I tried it. It removed a lot more clear coat than sanding. I have just a little more to go, and then I'll go back to sanding to remove more oxidation and smooth out the color.
There are a couple of areas where the finish is completely gone, and I will have to prime and paint them. And I may yet end up painting the whole hood before clear coating. That is a laborious process, from what I've read -- paint, let dry, sand. Paint, let dry, sand. Over and over. This is to remove something called "orange peel," which I assume is a pitted textured surface caused by tiny bubbles... but I don't know for sure. Then the routine is clear coat, let dry, sand. Clear coat, let dry, sand, over and over... Sigh...
Thank goodness for my little Black and Decker palm sander!
In any case, even if I just prime and paint the two (so far) small problem areas, I'm not fooling myself into believing the thing can look like it did new.
 Here's how it looks on day two of the project. The red-circled areas are those places where the paint is gone; will have to be primed and painted. But before that, the rest of the hood will have to be sanded until the oxidation is gone. And it is getting there.The areas of oxidation, lighter than the original paint color, have darkened considerably with sanding. In the photo above, I swabbed the hood with a wet cloth to simulate clear coat, and some of what you see is reflection; but there is still considerable discoloration.
Obviously, I've still got work to do, but I think it will turn out okay.
In any case, can't possibly look any worse than it did when I started. Will post an update when the project is finished.
* * *
There are two other car projects. One day a few weeks ago, the dash lights didn't come on, and I thought there might be a short or something, so I banged on the dash to see if that would help -- and knocked a hole in it. The broken part tumbled down inside. I have since found out from e-bay that the broken piece is called a bezel. Hubs knows how to remove it, so I want to rescue the broken pieces and glue or fiberglass them back on, fill and sand the cracks and spray-paint the repair. I also want to order a dash grill -- only about $10 on Amazon -- and if its the wrong color, I'll spray it, too!
Lastly, I need to repair the handle on the interior side of the driver's door, and repair the door panel, which has defied all my efforts to fix it. I can't used the arm-rest to close the door -- it just pulls the door panel away from the door. This means I have to start the car, roll the window down a little and grab the door itself to close it. Cumbersome, and it makes me feel vulnerable, being unable to close the door immediately after getting behind the wheel....
I recently watched a YouTube video on how to remove and reinstall a door panel for my model SUV, and what a revelation! It's all one piece! I thought that above the arm-rest was one section, and below it another -- and on mine, the front part of the lower section was still attached to the door. Wrong. It's still attached to its top half!
So, I bought a fiberglass repair kit and I'm gonna fiberglass the sucker back together, then reinstall. There are a couple of bolts hidden beneath the arm-rest, but the part of the door panel they bolt through is gone, so I will have to fabricate some kind of little tab and drill a hole to reattach the bolts.
My last project for the foreseeable future (and this can wait, it's not that important) is to replace the fabric of the sun visors and remove the lighted mirrors. They are covered by a hinged "door" that turns off the two lights on each side of the mirror when they are closed -- and both have dropped off and are in the glove box. I'm not going to hunt for mirror replacement with little doors intact -- I never understood the purpose of lights that close to a mirror, anyway. It's the same principle with a lighted makeup mirror. All they do is shine in your eyes and prevent you from seeing your reflection!
Will post the resolution of these other projects when they are completed, too.
UPDATE! Well, the door panel is repaired, but now my driver's side door handle doesn't work (the interior one) and the lock won't work. It's electrical and I think it's draining the battery!
Stay tuned as the drama continues!
How To Install Replace Door Panel Chevy S-10 Blazer 4 Door 95-05
https://youtu.be/fS8_IxMcUpQ
This was most helpful....
Fix/Repair Peeling,Flaking or Burnt Clear Coat For $15
https://youtu.be/qxgD9N-Q58Y
This is what saved me lots of time by suggesting clear coat removal by scraping with a razor blade.
The $50 Paint Job
http://www.rickwrench.com/index79master.htm?http://www.rickwrench.com/50dollarpaint.html
Thought this was fascinating -- roller painting a car?!? -- but I don't know whether I could find Rustoleum that would match my vehicle's paint. Spray paints in rattle cans at auto parts stores will be a likelier match.
I had no idea one swerve would take me into auto repair.
 |
| Before |
Until and unless I become a best-selling author making beaucoup money, there's not a new car purchase, or even a used one, in the foreseeable future. And frankly, I'd just as soon not spend my retirement on an auto paint job.
So I've been reading up online about DIY clear coat repair and auto painting, and I decided on a plan of action. Beneath the clear coat -- where it has peeled and some places where it is intact, the paint has oxidized. I wondered if, beneath the oxidation, the color was still there. Back in the old days, before clear coat, when auto paint oxidized, it could be buffed out.
After Googling and reading, I concluded buffing wouldn't do the job. I needed to remove the clear coat and sand the paint to get rid of the oxidized areas. Once the whole hood was more or less the same color, I could reapply clear coat.
The Project Begins
I don't have a lot of time to spend on the project -- just parts of each day. But I've been at it -- sanding -- for two days, and there has been some progress. Today, I remembered reading online about somebody who had scraped off their failing clear coat with a razor scraper. I found one I had stashed away for house fix up, and I tried it. It removed a lot more clear coat than sanding. I have just a little more to go, and then I'll go back to sanding to remove more oxidation and smooth out the color.
There are a couple of areas where the finish is completely gone, and I will have to prime and paint them. And I may yet end up painting the whole hood before clear coating. That is a laborious process, from what I've read -- paint, let dry, sand. Paint, let dry, sand. Over and over. This is to remove something called "orange peel," which I assume is a pitted textured surface caused by tiny bubbles... but I don't know for sure. Then the routine is clear coat, let dry, sand. Clear coat, let dry, sand, over and over... Sigh...
Thank goodness for my little Black and Decker palm sander!
In any case, even if I just prime and paint the two (so far) small problem areas, I'm not fooling myself into believing the thing can look like it did new.
Obviously, I've still got work to do, but I think it will turn out okay.
In any case, can't possibly look any worse than it did when I started. Will post an update when the project is finished.
There are two other car projects. One day a few weeks ago, the dash lights didn't come on, and I thought there might be a short or something, so I banged on the dash to see if that would help -- and knocked a hole in it. The broken part tumbled down inside. I have since found out from e-bay that the broken piece is called a bezel. Hubs knows how to remove it, so I want to rescue the broken pieces and glue or fiberglass them back on, fill and sand the cracks and spray-paint the repair. I also want to order a dash grill -- only about $10 on Amazon -- and if its the wrong color, I'll spray it, too!
Lastly, I need to repair the handle on the interior side of the driver's door, and repair the door panel, which has defied all my efforts to fix it. I can't used the arm-rest to close the door -- it just pulls the door panel away from the door. This means I have to start the car, roll the window down a little and grab the door itself to close it. Cumbersome, and it makes me feel vulnerable, being unable to close the door immediately after getting behind the wheel....
I recently watched a YouTube video on how to remove and reinstall a door panel for my model SUV, and what a revelation! It's all one piece! I thought that above the arm-rest was one section, and below it another -- and on mine, the front part of the lower section was still attached to the door. Wrong. It's still attached to its top half!
So, I bought a fiberglass repair kit and I'm gonna fiberglass the sucker back together, then reinstall. There are a couple of bolts hidden beneath the arm-rest, but the part of the door panel they bolt through is gone, so I will have to fabricate some kind of little tab and drill a hole to reattach the bolts.
My last project for the foreseeable future (and this can wait, it's not that important) is to replace the fabric of the sun visors and remove the lighted mirrors. They are covered by a hinged "door" that turns off the two lights on each side of the mirror when they are closed -- and both have dropped off and are in the glove box. I'm not going to hunt for mirror replacement with little doors intact -- I never understood the purpose of lights that close to a mirror, anyway. It's the same principle with a lighted makeup mirror. All they do is shine in your eyes and prevent you from seeing your reflection!
Will post the resolution of these other projects when they are completed, too.
UPDATE! Well, the door panel is repaired, but now my driver's side door handle doesn't work (the interior one) and the lock won't work. It's electrical and I think it's draining the battery!
Stay tuned as the drama continues!
* * *
Videos and websites I found helpful:How To Install Replace Door Panel Chevy S-10 Blazer 4 Door 95-05
https://youtu.be/fS8_IxMcUpQ
This was most helpful....
Fix/Repair Peeling,Flaking or Burnt Clear Coat For $15
https://youtu.be/qxgD9N-Q58Y
This is what saved me lots of time by suggesting clear coat removal by scraping with a razor blade.
The $50 Paint Job
http://www.rickwrench.com/index79master.htm?http://www.rickwrench.com/50dollarpaint.html
Thought this was fascinating -- roller painting a car?!? -- but I don't know whether I could find Rustoleum that would match my vehicle's paint. Spray paints in rattle cans at auto parts stores will be a likelier match.

Friday, March 27, 2015
When I Say MCM....
...I mean a lot of different things. Architectural styles -- Wright's Usonian and Prairie styles, Pierre Koenig's flat-roofed, glass walled Case Study beauties, with minimal ornamentation, furnishings, and motifs from the period following World War II, dubbed, among other things, the atomic age or the space age (from atom bomb testing and the space race between the USA and the USSR). It means the popular music of the 50s and 60s -- from Your Hit Parade to Jimi Hendrix; Sassoon hair cuts and Mary Quant fashions, and Mustangs, Camaros and Volkswagen Beetles.
But much of the time, MCM, as it refers to houses and decor, means things I remember growing up -- some from my parents' houses, some from my friends'...
Recently, some images were posted in one of my MCM online groups that I found especially attractive and evocative. That happens pretty often on my groups, but these images were particularly striking. I messaged the posters, Mr. Brown and Mr. Wagner, and asked permission to bring the photos here. (Many thanks, gentlemen.)
The first two are two views of the same room, a living room, and it is such a sweet room, who could resist it? Yes, there are bigger, more breathtaking MCM spaces with soaring ceilings and walls of glass -- but this one especially speaks to me. I don't know what the rest of the house looks like, or the exterior, but it might be what's come to be known as "mid-century modest" -- smaller, sometimes tract homes, as opposed to big houses with big name architects and big name builders... But still, so evocative of the era.
Part of it is without doubt the colors -- the warmth of the orange sectional and green and brown walls. Of course, with the Internet, you don't know whether the colors are being rendered accurately or not. Nevertheless, in this image, they are the colors that inspire me, and that I want to duplicate in my house. I can't recreate this room, but that's not necessary, anyway. I want to recreate the atmosphere, the slashes of light, the lack of clutter...
Here's another view:
The lack of clutter and the warmth continues, and the atmosphere of the post WWII era is captured in the console TV, the pinch-pleated drapes topped with a wood cornice, and a tension pole holding LP jackets. Just a great room all around.
And then we come to a kitchen that I could well have visited numerous times as a teen in Alabama, at least, as far as color is concerned. I'm not sure when this house was built; the architect was an apprentice of Frank Lloyd Wright, which no doubt explains the quality that evokes a yearning in the viewer. The whole house has this appeal.
The computer screen has rendered the primary colors (counter and walls) as orange and pale green. In fact, the home's owner says the counter tops are Chinese red. Those colors combined with the rich brown of the wood cabinets makes this kitchen a place where you want to stay and visit.
And although there are lots of things visible -- books, canisters, spices, and more, the clutterless feeling comes across unmistakably. I've seen pictures of kitchens with far fewer items on display that looked far more cluttered.
HGTV kitchens with their granite countertops and subway tile back-splashes look coarse and cumbersome by comparison to this room that somehow manages to be both sweet and sophisticated.
It is absolutely certain I could not duplicate this kitchen, or anything close to it, in my house. But, like the living room above, this space serves as both instruction and inspiration. Although phase one of my kitchen (below) won't look anything like this, eventually, I hope to have orange laminate counter top and back splash -- already have a sample of orange Wilsonart laminate from Lowe's to keep me focused!

My photo editing skills and my vintage 1999 photo editor leave a lot to be desired, but this image gives an idea of the minimal amount of "fix-up"-- refinishing the cabinets, painting the walls, refurbishing the tile and installing new flooring. A nice little blank canvas to bring my non-clutter to, I hope. But if the book marketing techniques I'm learning pay off, and the author-services jobs keep rolling in, maybe it won't be too long before the kitchen above becomes this kitchen...


Meanwhile, all this MCM-ing is making me nostalgic! I believe I'll bring some '50s and '60s music over from YouTube.... Y'all enjoy!

But much of the time, MCM, as it refers to houses and decor, means things I remember growing up -- some from my parents' houses, some from my friends'...
Recently, some images were posted in one of my MCM online groups that I found especially attractive and evocative. That happens pretty often on my groups, but these images were particularly striking. I messaged the posters, Mr. Brown and Mr. Wagner, and asked permission to bring the photos here. (Many thanks, gentlemen.)
The first two are two views of the same room, a living room, and it is such a sweet room, who could resist it? Yes, there are bigger, more breathtaking MCM spaces with soaring ceilings and walls of glass -- but this one especially speaks to me. I don't know what the rest of the house looks like, or the exterior, but it might be what's come to be known as "mid-century modest" -- smaller, sometimes tract homes, as opposed to big houses with big name architects and big name builders... But still, so evocative of the era.
 |
| B.Brown |
Here's another view:
 |
| B.Brown |
And then we come to a kitchen that I could well have visited numerous times as a teen in Alabama, at least, as far as color is concerned. I'm not sure when this house was built; the architect was an apprentice of Frank Lloyd Wright, which no doubt explains the quality that evokes a yearning in the viewer. The whole house has this appeal.
The computer screen has rendered the primary colors (counter and walls) as orange and pale green. In fact, the home's owner says the counter tops are Chinese red. Those colors combined with the rich brown of the wood cabinets makes this kitchen a place where you want to stay and visit.
And although there are lots of things visible -- books, canisters, spices, and more, the clutterless feeling comes across unmistakably. I've seen pictures of kitchens with far fewer items on display that looked far more cluttered.
HGTV kitchens with their granite countertops and subway tile back-splashes look coarse and cumbersome by comparison to this room that somehow manages to be both sweet and sophisticated.
 |
| K. Wagner |
The kitchen, Phase One:
My photo editing skills and my vintage 1999 photo editor leave a lot to be desired, but this image gives an idea of the minimal amount of "fix-up"-- refinishing the cabinets, painting the walls, refurbishing the tile and installing new flooring. A nice little blank canvas to bring my non-clutter to, I hope. But if the book marketing techniques I'm learning pay off, and the author-services jobs keep rolling in, maybe it won't be too long before the kitchen above becomes this kitchen...
...complete with black appliances and and chrome accessories...
 |
| (Lowe's, Etsy) |
My amateur photoshoppin' of the living room maybe -- maybe -- shows just a hint of the inspiration and vision that so attracted me to Mr. Brown's living room, but of course lacks the warm of reality, of the play of shadow and light, the subtle color variations... Maybe, when I make it to the Living Room phase of my home's OFMCM makeover, I can make photos what will better capture what I'm after.
Saturday, March 21, 2015
We're On Our Way
 |
| ebay |
The way I'm planning to do the bathroom doesn't look very MCM.
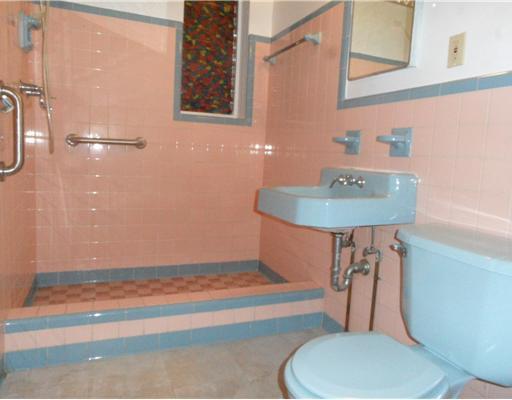
This is what a bathroom in a small, suburban ranch house in the early 60s looked like: Lots of ceramic tile, colors we now call "retro" (pink, turquoise, sea-green, along with neutrals like gray and black); sometimes with Formica countertops.
 |
| The Real Awakening Blog |
 |
| Lowe's |
In any case, my plans for the space include a the new tub surround discussed in the previous blog entry, and vintage-style sliding glass shower doors. Walls will be painted light brown -- a somewhat desaturated cafe au lait... Vinyl floor tiles with a faux stone look in browns with touches of green...
Here are a couple of before and projected-after images.

You can't tell in these images, but the faux marble vanity is a cream color with (thankfully) not much marbeling. When the tub is refinished, the vanity will be refinished as well -- both in glossy white. The vanity cabinet will be painted a semi-gloss dark brown, and get new hardware.

 |
| ebay |
And I still love the idea of using a vintage telephone stand, like the one pictured at the beginning of this entry, to hold a plant on the top and for storing rolls of tissue below.
 |
| Ace Hdwe |
 |
| ebaty |
Lastly, I'll be looking to gradually supplement our white bath linens with beige, sage and olive... It may not be fanciest decorating job, but it will certainly be an improvement over the worn, damaged bathroom we have now.

Saturday, March 7, 2015
Here's Hoping...
...that in the next few weeks, we'll get started on one of the two of the major projects facing us with our house -- replacing the tub surround in the hallway bathroom. Like many houses from the mid-20th century, this one has a window above the bathtub, and in the almost 60 years since the house was built, the wood frame and sill have sustained extensive water damage. Even worse, the is water damage behind the tub wall.
Best we can tell, ceramic tile was applied directly to the plaster walls in the tub area, and leaks behind the wall have led to some rotted furring strips on the outside wall. Fortunately, the studs on the inner walls don't seem to be damaged, but we won't know for sure until we remove the tile.
It seems unlikely that we can find the milled woodwork in the same pattern to replace the window facing, but very similar patterns are available at surprisingly reasonable cost at the big box home improvement stores. (I always thought millwork was very expensive; glad I did some price shopping!) Furring strips are quite cheap, and we won't need many. We will tear out the ceramic tile and the walls behind it, and replace them with backer board and a five-piece tub surround (three major pieces plus corners). These are available in various plastics for various prices (from fifty bucks to over a thousand). And apparently, a cut-out for the window is easy to do. (Just measure twice before cutting!)
The finish is gone on the tub, and we'll do a DIY refinish job with a Rustoleum or similar kit. Apparently, these DIY kits available today are a vast improvement over those from just a few years ago. Success depends greatly on how well the surface is prepared -- i.e., cleaned and sanded. Really, really sanded. We will see how will my little palm sander works for this job.
Once the tub wall and surround, window facings and tub surface are complete, we will install a sliding glass shower door salvaged from my late parents' retirement cottage. Aluminum framed with frosted glass, it is very much in keeping with the age and style of our house.
The last major bathroom change will be the vanity. The faux marble sink and homebuilt cabinet supporting it will be replaced. With what is uncertain right now. We didn't use the cabinet, so I'm considering an ordinary wall-hung white lavatory of vitreous china, possibly a pedestal model, if one can be found compatible with the style of the house, and for a reasonable cost. That should give the bathroom a larger and more open feel. The three-door medicine chest (husband's purchase; I hate it) will be replaced with one that mimics a mid-century model. (1950s "Satin Glide" model on the left, current model on the right; several manufacturers make similar items.)

Replacing the sheet vinyl floor with vinyl tiles will be a relatively easy job. I want a beige-green marble look. It will have to be carefully sealed to prevent water seeping into the seams.
The tacky floral striped wallpaper will come down off the walls, any holes or cracks will be spackled, and the walls painted cafe au lait.
Futura-syle linen hardware (two towel bars and a towel ring along with a toilet paper holder) will fit right in with the simplicity of the decor. And the piece de resistance, if I can find it, will be two original 1960s paint by numbers paintings (or prints made from them): the flamingos and snowy egrets set. Talk about Old Florida meets Mid-Century modern!

Love how this lady used a repurposed metal mesh telephone table for towel storage, though I think rolls of tissue might fit better. Pink bathroom at Retro Renovation Also like the little tray on the toilet lid holding soaps. So naturally I'm on the lookout for some vintage metal mesh accessories for the bath. Like so many other things from back then, they are small -- perfect for small rooms. (I also love the gold atomic stars she stenciled on the wall, and I'm keeping that idea in the back of my mind...for something. Who knows what!)
There's a lot of work to be done, but nothing particularly difficult, even for an ol' broad with bad knees...
And after that! On to the kitchen! I have finally come up with a color plan for the kitchen that is MCM out the ying-yang -- avocado and orange! It was inspired by photos posted on one of my MCM groups by members showcasing their authentic 1950s houses (one designed by a student of FLW). But I remember visiting in homes back in the 50s and 60s with orange Formica countertops and walls of olive or avocado...
Can't wait!

That's it for now. Will post occasional reports as the work progresses.

Best we can tell, ceramic tile was applied directly to the plaster walls in the tub area, and leaks behind the wall have led to some rotted furring strips on the outside wall. Fortunately, the studs on the inner walls don't seem to be damaged, but we won't know for sure until we remove the tile.
It seems unlikely that we can find the milled woodwork in the same pattern to replace the window facing, but very similar patterns are available at surprisingly reasonable cost at the big box home improvement stores. (I always thought millwork was very expensive; glad I did some price shopping!) Furring strips are quite cheap, and we won't need many. We will tear out the ceramic tile and the walls behind it, and replace them with backer board and a five-piece tub surround (three major pieces plus corners). These are available in various plastics for various prices (from fifty bucks to over a thousand). And apparently, a cut-out for the window is easy to do. (Just measure twice before cutting!)
The finish is gone on the tub, and we'll do a DIY refinish job with a Rustoleum or similar kit. Apparently, these DIY kits available today are a vast improvement over those from just a few years ago. Success depends greatly on how well the surface is prepared -- i.e., cleaned and sanded. Really, really sanded. We will see how will my little palm sander works for this job.
Once the tub wall and surround, window facings and tub surface are complete, we will install a sliding glass shower door salvaged from my late parents' retirement cottage. Aluminum framed with frosted glass, it is very much in keeping with the age and style of our house.
The last major bathroom change will be the vanity. The faux marble sink and homebuilt cabinet supporting it will be replaced. With what is uncertain right now. We didn't use the cabinet, so I'm considering an ordinary wall-hung white lavatory of vitreous china, possibly a pedestal model, if one can be found compatible with the style of the house, and for a reasonable cost. That should give the bathroom a larger and more open feel. The three-door medicine chest (husband's purchase; I hate it) will be replaced with one that mimics a mid-century model. (1950s "Satin Glide" model on the left, current model on the right; several manufacturers make similar items.)
Replacing the sheet vinyl floor with vinyl tiles will be a relatively easy job. I want a beige-green marble look. It will have to be carefully sealed to prevent water seeping into the seams.
The tacky floral striped wallpaper will come down off the walls, any holes or cracks will be spackled, and the walls painted cafe au lait.
Futura-syle linen hardware (two towel bars and a towel ring along with a toilet paper holder) will fit right in with the simplicity of the decor. And the piece de resistance, if I can find it, will be two original 1960s paint by numbers paintings (or prints made from them): the flamingos and snowy egrets set. Talk about Old Florida meets Mid-Century modern!
Love how this lady used a repurposed metal mesh telephone table for towel storage, though I think rolls of tissue might fit better. Pink bathroom at Retro Renovation Also like the little tray on the toilet lid holding soaps. So naturally I'm on the lookout for some vintage metal mesh accessories for the bath. Like so many other things from back then, they are small -- perfect for small rooms. (I also love the gold atomic stars she stenciled on the wall, and I'm keeping that idea in the back of my mind...for something. Who knows what!)
There's a lot of work to be done, but nothing particularly difficult, even for an ol' broad with bad knees...
And after that! On to the kitchen! I have finally come up with a color plan for the kitchen that is MCM out the ying-yang -- avocado and orange! It was inspired by photos posted on one of my MCM groups by members showcasing their authentic 1950s houses (one designed by a student of FLW). But I remember visiting in homes back in the 50s and 60s with orange Formica countertops and walls of olive or avocado...
Can't wait!
That's it for now. Will post occasional reports as the work progresses.
Saturday, February 28, 2015
In Search Of...
Check the right sidebar ------------>> and you'll see a list of pages -- "Home" and "In Search Of..."
"In Search Of..." is new and comprises a list of MCM items I'm looking for, to buy or possibly to trade for. I have some MCM items I don't need and will be looking to sell or trade them. I'll soon have another page showing these items, with information about how to purchase or trade for them. I likely won't have enough time or merchandise to start an etsy store, so I will probably list the items on MCM buy/sell/trade groups on Facebook, or the old standby, ebay.
It will be a little while before I need these items, though if there are some real bargains, I can go ahead and get them. But for the short-term future, we will be doing some structural repairs and renovations, and cosmetic changes, in the kitchen and baths. Once that's out of the way.... Woohoo!
Subscribe to:
Posts (Atom)